

Why You’ll Love This panko shrimp recipe
- Ease of preparation: This panko shrimp recipe is incredibly simple and quick to make, perfect for busy weeknights or impromptu meals. With minimal ingredients and straightforward steps, you can have a crispy, flavorful dish ready in under 30 minutes.
- Health benefits: Using Japanese-style panko breadcrumbs offers a lighter, crispier coating that reduces greasiness compared to traditional breading. Shrimp is a lean protein rich in omega-3 fatty acids, vitamins, and minerals, promoting heart health and supporting immunity.
- Versatility: This panko shrimp recipe easily adapts to various dietary needs. You can substitute shrimp with plant-based proteins for vegan dishes or use gluten-free panko for those with gluten sensitivity, all without compromising on flavor or texture.
- Distinctive flavor: The golden, crunchy panko crust combined with tender, juicy shrimp creates a delightful contrast. Subtle seasoning enhances the natural seafood flavor, delivering a satisfying texture and taste experience that stands out among shrimp recipes.
Essential Ingredients for panko shrimp recipe
- 1 lb large shrimp, tails on, shelled and deveined – provides the main protein and fresh seafood taste
- 2 cups Japanese-style panko breadcrumbs – creates a light, crispy exterior
- 1/2 cup all-purpose flour – helps breadcrumbs stick and ensures even coating
- 2 large eggs – acts as a binder for the panko coating
- 1/4 cup water – thins the batter slightly for better adhesion
- 1/2 tsp garlic powder – adds savory depth
- 1/2 tsp salt – balances flavors
- 1/4 tsp black pepper, or to taste – provides subtle heat
- Neutral frying oil (avocado, canola, sunflower, or grapeseed) – for crisp frying without overpowering flavor
- Optional dipping sauce: 1/4 cup mayonnaise and 2 tbsp sriracha – offers a creamy, spicy accompaniment
Special Dietary Options:
- Vegan: Replace shrimp with tofu or seasoned vegetables and use plant-based mayonnaise in the dipping sauce
- Gluten-free: Use gluten-free panko and flour alternatives like rice flour to maintain crispiness
- Low-calorie: Opt for baking instead of frying and reduce oil absorption by using an air fryer or oven
How to Prepare the Perfect panko shrimp recipe: Step-by-Step Guide
First Step: Prepare the shrimp
Start by ensuring the shrimp are shelled and deveined. Make small slits along the underside of each shrimp to help them flatten and cook evenly. Pat thoroughly dry with paper towels to remove excess moisture this helps the batter stick better.
Second Step: Make the wet batter
In a mixing bowl, whisk together the eggs, all-purpose flour, water, garlic powder, salt, and pepper. The batter should have a consistency slightly thinner than pancake batter to coat the shrimp evenly without clumps.
Third Step: Set up coating stations
Arrange three bowls or plates: one with the flour mixture, one with the wet batter, and one with panko breadcrumbs spread evenly. This assembly line setup simplifies the breading process.
Fourth Step: Coat the shrimp
- Dip each shrimp first into the flour mixture, shaking off the excess.
- Then, submerge the shrimp in the wet batter, allowing excess to drip.
- Finally, press the shrimp into the panko breadcrumbs, making sure they’re fully coated and gently pressing so no bare spots remain.
Fifth Step: Rest before frying
Place coated shrimp on a wire rack or tray for 10-15 minutes. Resting helps the panko stick better during frying, reducing breadcrumb loss in hot oil.
Sixth Step: Heat oil and fry shrimp
Heat neutral frying oil in a heavy-bottom pan or deep fryer to 325-350°F (160-177°C). Fry shrimp in small batches of 4-6 to prevent overcrowding and temperature drops. Cook each side for 2-3 minutes until golden brown and shrimp are opaque and fully cooked.
Final Step: Drain and serve
Remove shrimp and place on a wire rack to drain excess oil and keep crispiness. Serve immediately with optional sriracha mayo dipping sauce or a squeeze of fresh lemon. For dietary alternatives, bake the panko shrimp at 425°F for 10-12 minutes, flipping halfway through for a crispy finish.
Keep your oil temperature steady using a thermometer for consistent crispy results without greasy shrimp.

Dietary Substitutions to Customize Your panko shrimp recipe
Protein and Main Component Alternatives
- Swap shrimp with firm tofu or chickpea flour-coated vegetables for vegan-friendly options.
- Use scallops or chicken tenders for a different seafood or poultry twist.
- Choose cauliflower florets or zucchini strips for a vegetable-focused dish.
Vegetable, Sauce, and Seasoning Modifications
- Replace garlic powder with smoked garlic powder for a deeper flavor profile.
- Use tamari or coconut aminos instead of soy sauce for gluten-free stir fry sauces.
- Add fresh herbs such as parsley, cilantro, or basil for aromatic variation.
- Incorporate spicy elements like sriracha, chili flakes, or cayenne pepper for heat.
- Season panko breadcrumbs with nutritional yeast to boost umami in vegan versions.
Mastering panko shrimp recipe: Advanced Tips and Variations
| Tip | Details |
|---|---|
| Pro cooking techniques | Double-dip shrimp in egg and panko to build a thicker crust. Maintain oil temperature at 350°F using a deep-fry thermometer to avoid greasy or undercooked shrimp. |
| Flavor variations | Add lemon zest and fresh dill to the breadcrumb mix for a bright herbaceous twist or include curry powder for a savory note. |
| Presentation tips | Serve panko shrimp atop mixed greens with aioli or flavored mayo drizzle. Garnish with lemon wedges and chopped chives for color and freshness. |
| Make-ahead options | Bread shrimp in advance and refrigerate on a baking sheet covered with parchment paper. Fry just before serving to maintain crispness. |
How to Store panko shrimp recipe: Best Practices
- Refrigeration: Store cooked panko shrimp in an airtight container for up to 3 days. Reheat in the oven or air fryer to preserve crispiness instead of microwaving.
- Freezing: Freeze uncooked breaded shrimp in a single layer on a baking sheet. Transfer to freezer bags for up to 1 month. Cook straight from frozen, adding a few minutes to cooking time.
- Reheating: Preheat oven to 375°F and warm shrimp for 8-10 minutes to restore crunch and ensure food safety.
- Meal prep considerations: Prepare coating and shrimp separately for batch cooking. Assemble and cook portions individually to avoid soggy shrimp and maintain freshness.

FAQs: Frequently Asked Questions About panko shrimp recipe
What size and type of shrimp should I use for a crispy panko shrimp recipe?
Can I make panko shrimp in an air fryer and how do I do it?
Why do I need to make small cuts on the underside of shrimp when preparing panko shrimp?
What type of oil and temperature is best for frying panko shrimp?
How should I store and reheat leftover panko shrimp to keep them crispy?
panko shrimp recipe
- Total Time: 30-35 minutes
- Yield: 4 servings
- Diet: Pescatarian
Description
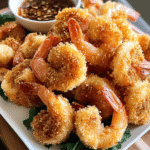
🍤 Dive into the delectable world of Panko Shrimp with its irresistibly crispy exterior and juicy, tender interior.
🥢 A perfect blend of flavors, making it a standout dish for any meal occasion.
Ingredients
– 1 lb large shrimp, tails on, shelled and deveined
– 2 cups Japanese-style panko breadcrumbs
– 1/2 cup all-purpose flour
– 2 large eggs
– 1/4 cup water
– 1/2 tsp garlic powder
– 1/2 tsp salt
– 1/4 tsp black pepper
– Neutral frying oil
– 1/4 cup mayonnaise
– 2 tbsp sriracha
Instructions
First Step: Prepare the shrimp Start by ensuring the shrimp are shelled and deveined. Make small slits along the underside of each shrimp to help them flatten and cook evenly. Pat thoroughly dry with paper towels to remove excess moisture this helps the batter stick better.
Second Step: Make the wet batter In a mixing bowl, whisk together the eggs, all-purpose flour, water, garlic powder, salt, and pepper. The batter should have a consistency slightly thinner than pancake batter to coat the shrimp evenly without clumps.
Third Step: Set up coating stations Arrange three bowls or plates: one with the flour mixture, one with the wet batter, and one with panko breadcrumbs spread evenly. This assembly line setup simplifies the breading process.
Fourth Step: Coat the shrimp
- Dip each shrimp first into the flour mixture, shaking off the excess.
- Then, submerge the shrimp in the wet batter, allowing excess to drip.
- Finally, press the shrimp into the panko breadcrumbs, making sure they’re fully coated and gently pressing so no bare spots remain.
Fifth Step: Rest before frying Place coated shrimp on a wire rack or tray for 10-15 minutes. Resting helps the panko stick better during frying, reducing breadcrumb loss in hot oil.
Sixth Step: Heat oil and fry shrimp Heat neutral frying oil in a heavy-bottom pan or deep fryer to 325-350°F (160-177°C). Fry shrimp in small batches of 4-6 to prevent overcrowding and temperature drops. Cook each side for 2-3 minutes until golden brown and shrimp are opaque and fully cooked.
Final Step: Drain and serve Remove shrimp and place on a wire rack to drain excess oil and keep crispiness. Serve immediately with optional sriracha mayo dipping sauce or a squeeze of fresh lemon. For dietary alternatives, bake the panko shrimp at 425°F for 10-12 minutes, flipping halfway through for a crispy finish.
Notes
🦐 Use the largest shrimp available for best texture and presentation.
🦐 Always pat shrimp dry to ensure the batter sticks well and coating stays crispy.
🦐 Rest coated shrimp before frying to prevent breadcrumbs from falling off.
- Prep Time: 20 minutes
- Resting Time: 10-15 minutes
- Cook Time: 10 minutes
- Category: Main Course
- Method: Frying
- Cuisine: Japanese
Nutrition
- Serving Size: 4 shrimp
- Calories: 425 kcal
- Sugar: 3 g
- Sodium: 1200 mg
- Fat: 16 g
- Saturated Fat: 4 g
- Unsaturated Fat: 12 g
- Trans Fat: 0 g
- Carbohydrates: 44 g
- Fiber: 2 g
- Protein: 10 g
- Cholesterol: 115 mg
Keywords: Panko Shrimp, Steak Stir Fry, Quick Dinner, Tasty Dinner