Description
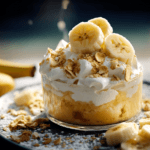
🍌 This creamy, no-bake banana pudding is a time-saving delight that’s perfect for satisfying your sweet tooth without the hassle! 😋
💛 Packed with comforting flavors and simple ingredients, it’s a must-try dessert that will have everyone coming back for seconds! 🍮
Ingredients
Instant banana pudding mix or vanilla pudding mix
Sweetened condensed milk
Cream cheese
Milk (whole milk, 2%, or heavy cream)
Vanilla extract
Fresh bananas
Nilla wafers (or shortbread cookies, butter cookies, or animal crackers as substitutes)
Heavy whipping cream or Cool Whip
Powdered sugar
Optional variations:
Banana extract
Chocolate chips
Caramel drizzle
Crushed pecans or walnuts
Instructions
1. Gather Your Ingredients: Collect all the necessary ingredients including instant banana or vanilla pudding mix, sweetened condensed milk, cream cheese, milk, vanilla extract, fresh bananas, Nilla wafers, heavy whipping cream or Cool Whip, and powdered sugar. Measure them out to streamline the preparation process.
2. Prepare the Pudding Base: In a mixing bowl, combine the instant pudding mix, cream cheese, and sweetened condensed milk. Whip until the mixture is smooth, then gradually add cold milk while continuing to beat until the mixture thickens slightly. Fold in vanilla extract for added flavor depth.
3. Assemble the Layers: Place a layer of Nilla wafers at the bottom of your serving dish. Add a layer of evenly sliced bananas on top. Pour a layer of the pudding mixture over the bananas and wafers, spreading evenly with a spatula. Continue layering wafers, bananas, and pudding until all ingredients are used, finishing with a pudding layer on top.
4. Chill and Set: Cover the assembled pudding with plastic wrap and refrigerate for at least 2 to 3 hours. For best results, chill overnight to let the flavors meld and the wafers soften.
5. Prepare Whipped Topping: If opting for homemade whipped cream, beat heavy whipping cream with powdered sugar until stiff peaks form. Alternatively, use Cool Whip for convenience.
6. Add the Topping: Spread or pipe the whipped topping over the chilled pudding. Smooth it out or create decorative swirls for presentation.
7. Garnish as Desired: Enhance the dessert with garnishes such as additional banana slices, Nilla wafers, a sprinkle of nuts, or a drizzle of caramel or chocolate sauce.
8. Serve and Enjoy: Scoop and serve the pudding in bowls or cups. Share and savor the delicious layers of creamy pudding, ripe bananas, and soft wafers with family and friends.
9. Store Leftovers Properly: Cover the remaining pudding tightly with plastic wrap and store it in the refrigerator for up to 2 to 3 days for the best flavor and texture. Avoid freezing to maintain quality.
10. Get Creative with Variations: Experiment with different cookie options, add flavor infusions like cinnamon or bourbon, or adjust sweetness levels to suit your taste. Customize as needed for dietary preferences or extra flair.
Notes
1. Use fresh and high-quality ingredients like ripe, firm bananas and freshly whipped cream for a richer flavor.
2. Experiment with cookie options such as shortbread cookies or ginger snaps to give your banana pudding a unique twist.
3. Allow your dessert to chill overnight for the best texture and flavor combination, as the layers meld together seamlessly.
- Prep Time: 15
- Cook Time: 10
- Category: Dessert
- Method: No Bake
- Cuisine: United States